Java Implementation of the same algorithm you can also see here as a C++ solution. The input file can be used from any dictionary as long as it is in the format of "index word" tab delimited file, where the index is a 5 digit value in the range of [1-6] for each digit.
import java.io.*; // Needed for the File and IOException
import java.util.Random;
/**
* This application was designed after an elev year old girl who appeared in the news starting her * business generating passwords for $2. http://www.welivesecurity.com/2015/10/29/11-year-old-sets-cryptographically-secure-password-business/
* Dictionary used in this example was generated from - http://world.std.com/~reinhold/diceware.wordlist.asc
*
* @author Zoltan Szabo
* @version 1.0.0
*/
public class DiceWare
{
public static void main(String[] args)throws IOException,InterruptedException{
// Open the file.
File file = new File("t:\\dict.txt");
RandomAccessFile inputFile = new RandomAccessFile(file,"r");
int index,value;
final int NUM_WORDS = 6, DIE_SIDES=6;
String temp="",word="",password="";
Random rand=new Random();
//generate random ASCII special character to add to the end of the password
char addChar = (char)(rand.nextInt(15) + 33);
String[] myTuples=null;
for (int i = 0; i < NUM_WORDS; i++){
do{
value = (rand.nextInt(DIE_SIDES)+1)*(int)Math.pow(10, 4)
+ (rand.nextInt(DIE_SIDES)+ 1)*(int)Math.pow(10, 3)
+ (rand.nextInt(DIE_SIDES)+ 1)*(int)Math.pow(10, 2)
+ (rand.nextInt(DIE_SIDES)+ 1)*(int)Math.pow(10, 1)
+ (rand.nextInt(DIE_SIDES)) + 1;
temp=inputFile.readLine();
if(temp!=null) myTuples=temp.split("\t");
index = new Integer(myTuples[0]).intValue();
if(index!=-1)word = myTuples[1];
if (index == value){
break; //stop looking if the generated value is found
}//end of if value found
} while (word!= null);//end of while reading the file
inputFile.seek(0); //reset the file to its beginning for the new search
password+=word;
if (i == 4){password += addChar; break;}
password += '/';
Thread.sleep(1000); //needs to sleep for a second to catch up with file operations
}//end of for loop of generating 5 random words
System.out.println("Your generated password is: " +password );
inputFile.close();
}
}
Saturday, October 31, 2015
Thursday, October 29, 2015
11 Year Old's Algorithm in C++
Why would you roll dice and do this simple task manually? Just write a code to do it for you if you'd like to use this algorithm.
http://www.welivesecurity.com/2015/10/29/11-year-old-sets-cryptographically-secure-password-business/
//Version: 1.0.0
//Description: 11-year-old sets up cryptographically secure password business - http://www.welivesecurity.com/2015/10/29/11-year-old-sets-cryptographically-secure-password-business/
//To begin, a dice is rolled five times, with each numbered result documented.This then leaves you with a code, such as 12345. This result is already categorized in a dictionary, next to which is a word(which is ‘apathy’ in this instance).
//DiceYou then repeat this process six times and then band all the words together.You now have at your disposal an entirely bespoke and very long password that even the most powerful of computers will struggle to crack.
//Add a random character at the end and you’ve got an even stronger password, such as : apathy / sew / fungal / title / larch / maul / %.
//Required libraries
#include<iostream> //cin, cout, endl
//#include<conio.h> //_getch() that replaced the old getch()
#include<string> //string
#include<fstream> //ifstream
#include<Windows.h> //Sleep(), srand(), rand()
#include<time.h> //time()
#include<cmath> //pow()
//Namespace specified to avoid using std:: with cin, cout, endl, ...
using namespace std;
int main(int argc, char* argv[]){
ifstream inFile;
inFile.open(argv[1]);
int index,value;
const int NUM_WORDS = 6, DIE_SIDES=6;
string word,password;
srand(time(NULL));
char addChar = (rand() % 15) + 33; //generate random ASCI special character to add to the end of the password
if (!inFile){
cout << "Input file is missing." << endl;
return 1;
}
for (int i = 0; i < NUM_WORDS; i++){
do{
srand(time(NULL));
value = ((rand() % DIE_SIDES) + 1)*pow(10, 4)
+ ((rand() % DIE_SIDES) + 1)*pow(10, 3)
+ ((rand() % DIE_SIDES) + 1)*pow(10, 2)
+ ((rand() % DIE_SIDES) + 1)*pow(10, 1)
+ ((rand() % DIE_SIDES) + 1);
inFile >> index >> word;
if (index == value){
break; //stop looking if the generated value is found
}//end of if value found
} while (inFile);//end of while reading the file
inFile.clear();
inFile.seekg(0, ios::beg); //reset the file to its beginning for the new search
password.append(word);
if (i == 5){password += addChar; break;}
password += '/';
Sleep(1000); //needs to sleep for a second to catch up with file operations
}//end of for loop of generating 5 random words
cout << "Your generated password is: " << password << endl;
inFile.close();
system("pause"); //Let the user determine when the application terminates
//_getch();
return 0; //return integer data type to OS to indicate errorlevel
}
Sunday, October 4, 2015
Java, C++, and Python from USB
I need you guys to download the following large file that includes
Eclipse configured with Java, C++, Python. Download it, extract it to
your USB drive, label your USB as ECLIPSEIDE, under Eclipse folder
double-click "run-eclipse.bat" and let me know if you can compile the
"Hello World" application for all three languages. I will make a video
as well to some of you to follow. This will make every student's life
much easier in programming classes.
version: 2.0.1 10/7/2015
https://drive.google.com/file/d/0ByrtM1fcMgt6bUs0SXFyVXVWU2M/view?usp=sharing
A quick introduction to how to use the thumb drive tools: I'll create one if requested
Before you do all this, make sure you select a fast thumb drive. Selecting the best performing thumb drive will require for you to do a little research, but you should benefit from the process and develop your scientific methodology.
First, you should research the technology specifications for the USB technology.
USB 3.1


version: 2.0.1 10/7/2015
https://drive.google.com/file/d/0ByrtM1fcMgt6bUs0SXFyVXVWU2M/view?usp=sharing
A quick introduction to how to use the thumb drive tools: I'll create one if requested
Before you do all this, make sure you select a fast thumb drive. Selecting the best performing thumb drive will require for you to do a little research, but you should benefit from the process and develop your scientific methodology.
First, you should research the technology specifications for the USB technology.
USB 1.x
Released
in January 1996, USB 1.0 specified data rates of 1.5 Mbit/s (Low
Bandwidth or Low Speed) and 12 Mbit/s (Full Bandwidth or Full
Speed).
USB 2.0
Released
in April 2000, adding a higher maximum signaling rate of
480 Mbit/s (High Speed or High
Bandwidth), in addition to the USB 1.x Full Speed signaling rate of 12 Mbit/s. Due to bus
access constraints, the effective throughput of the High Speed signaling rate is limited to 280 Mbit/s
or 35 MB/s.
USB 3.0
USB 3.0
specification was released on 12 November 2008. USB 3.0 defines a new SuperSpeed transfer
mode, with associated new backwards-compatible plugs, receptacles, and cables.
SuperSpeed plugs and receptacles are identified with the logo, and, also, blue inserts in standard format
receptacles.
The
new SuperSpeed mode provides a data signaling rate of
5.0 Gbit/s. The payload throughput is 4 Gbit/s (due to the overhead
incurred by 8b/10b encoding), and the specification considers it
reasonable to achieve around 3.2 Gbit/s (0.4 GB/s or 400 MB/s),
which should increase with future hardware advances. Communication is full-duplex in
SuperSpeed transfer mode; earlier modes are half-duplex, arbitrated by the
host.
USB 3.1
A January 2013 press release from the USB
group revealed plans to update USB 3.0 to 10 Gbit/s. The group ended
up creating a new USB specification, USB 3.1, which was released on 31
July 2013, replacing USB 3.0 standard. USB 3.1 specification takes over
existing USB 3.0's SuperSpeed
USB transfer rate, newly also
referred to as USB 3.1 Gen 1,
and introduces a faster transfer rate called SuperSpeed
USB 10 Gbps, also referred to as USB 3.1 Gen 2, putting it on par with a single
first-generation Thunderbolt channel. The new mode's logo features
a caption stylized as SUPERSPEED+.
The USB 3.1 standard increases the data
signaling rate to 10 Gbit/s,
double that of SuperSpeed USB, and reduces line encoding overhead to just 3% by
changing the encoding scheme to 128b/132b. The first USB 3.1 implementation
demonstrated transfer speeds of 7.2 Gbit/s.
The USB 3.1 standard is backward compatible with USB 3.0 and USB 2.0.
Source: “USB”, Accessed: 5/5/2016, https://en.wikipedia.org/wiki/USB
Next, pull out the information from the text in a simplified format to serve as a reference.
Technology
|
Signaling rate
|
Transfer Rate
|
Effective Rate
|
USB 1.x
|
Low
Bandwidth or Low Speed
|
1.5 Mbit/s
|
|
Full
Bandwidth or Full Speed
|
12 Mbit/s
|
||
USB 2.0
|
High Speed or High Bandwidth
|
480 Mbit/s
|
280 Mbit/s or 35 MB/s
|
USB 3.0
|
SuperSpeed
USB
|
5.0 Gbit/s
|
4 Gbit/s, 3.2 Gbit/s
(0.4 GB/s or 400 MB/s),
|
USB 3.1
Gen 1
|
Thunderbolt channel
|
||
USB 3.1
Gen 2
|
SuperSpeed+
USB
|
10 Gbps
|
7.2 Gbit/s
|
So, what does a USB2 vs a USB3 device look like when it is inserted into computer and what if I insert a faster device into a slower port? Do not be afraid to as questions and explore the solutions.

Make sure you understand the ports and the different labels on your system. As you can see, in the image below, I have 2 x USB3 ports on top indicated by the SS ( SuperSpeed ) and 2 x USB2 ports below. It is very easy to not pay attention and plug your devices into the slower ports when they are so close to each other.

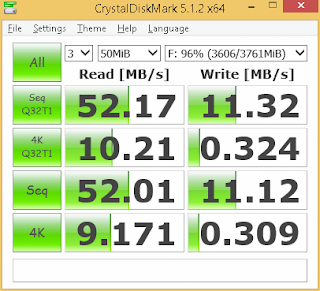
Now you are ready to test your devices by creating a table to hold your measurements. ( Note: If it is easy to find the manufacturer and model of the device, go to the manufacturer website and pull the published data transfer rates for each of the device to test the documentation's reliability. )

Then, you can start testing and documenting your device speeds.
USB3 Transcend 4GB - in USB 3 port

USB3 Transcend 4GB - in USB 2 port

USB2 Transcend 2GB - in USB3 port

USB2 Transcend 2GB - in USB2 port

USB2 PQI 1GB - USB 3

USB2 PQI 1GB - USB 2

USB2 Richland 54MB -
USB 3

USB2 Richland 54MB -
USB 2

Hard drive

Draw your conclusions and decide which device to use to hold your IDE environment. ( Note: Notice how much slower the hard drive performs in reading than a thumb drive and how much faster a hard drive is when writing data. )

Sunday, May 10, 2015
Mouse Jiggler
In some cases, you might want to keep the computer from going to sleep, hibernate, log off, turn the screen saver on. In a digital forensics case, you would need to keep the computer alive while transporting the device to the lab or a safer environment while the system would stay in a state that will not require re-login when the password is not known.
Thus, the easiest way would be to simulate user activity to keep the system "thinking" that the user is still using the system while in transit.
Instead of creating a separate GUI, I decided to just launch notepad from the system and move the mouse while notepad is open. If notepad is closed, the program exists. This is an AutoIt script if you want to see it work. Of course, you can set any executable besides notepad, but make sure you chose a small footprint file like calc.exe.
Opt("WinTitleMatchMode",2)
WinActivate("Notepad")
Dim $offset=50
Sleep(2000)
$checkWin=WinExists("Notepad")
if $checkWin = 0 then
ShellExecute ( "C:\Windows\notepad.exe" )
Sleep(2000)
$title = WinGetTitle("")
WinSetOnTop($title, "", 1)
WinActivate($title)
EndIf
$checkWin=WinExists("Notepad")
while 1 and $checkWin
if $checkWin = 1 then
WinActivate("Notepad")
MouseMove ( @DesktopWidth/2,(@DesktopHeight/2) + $offset, 10 )
Sleep(1000)
$checkWin=WinExists("Notepad")
if $offset == -50 then
$offset=50
Else
$offset=-50
EndIf
EndIf
WEnd
Saturday, May 9, 2015
GPT Partition Table Structure
GPT was designed to slowly replace the limited MBR structure. for backward compatibility, the old MBR structure is still maintained.

The boot code is the first 446 bytes that still includes the drive serial number for backward compatibility, but it is not used with GPT partitions when mounting it in Windows.
Each one of the 16 byte partition entries will have the structure:
Boot indicator - 1 byte
Start head - 1 byte
Start sector/cylinder - 2 bytes
Partition type - 1 byte
End head - 1 byte
End sector/cylinder- 2 bytes
Sectors preceding partition - 4 bytes
Sectors in partition - 4 bytes
Following the MBR's master partition entries, the standard 0x55AA is set.
0x200 - >SIGNATURE 8 characters ( "EFI PART" )
Revision ( 00 00 01 00 = 1.0 )
Headersize ( 92 bytes )
CRC32 of header ( set this field's values to all zeros to validate the value )
Reserved
Current LBA ( first should be 01 00 00 00 00 00 00 00 )
Backup LBA //location of the other head copy
First usable LBA //primary partition table last LBA+1 ( should be 22 00 00 00 00 00 00 00 )
Last usable LBA //secondary partition table first LBA-1
Disk GUID 16 byte values
Partition entries ( what will be visible in disk manager )
Number of partitions ( 128 )
Size of partitionEntry ( 128 )
CRC32 of partition array (128*128 bytes should be selected to verify)
// ensures no modifications if not used
420 bytes reserved //must be zeros
0x400 -> Each partition entries will have the same structure
Partition type GUID 16 hex values //http://en.wikipedia.org/wiki/GUID_Partition_Table
//first one should be EFI System partition C12A7328-F81F-11D2-BA4B-00A0C93EC93B
Partition GUID 16 hex values ( see image below )
Partition start LBA
Partition end LBA
Partition property //http://en.wikipedia.org/wiki/GUID_Partition_Table
Partition name up to 36 characters
The image below shows the GPT partition table entry and as it is used by the operating system to mount the partition ( HKEY_LOCAL_MACHINE\SYSTEM\MountedDevices ).

Friday, May 1, 2015
Apple Watch Customized
I not just got a hold of my first apple, but hacked it to my custom needs, and installed fingerprint authentication on top of it. I even managed to keep the air filtration system in place for reliable operation. The time values are encrypted, so only I can find out the actual time. It is not cheap plastic, but well engineered space age metal. It is not connected to the Internet to provide a very secure operation. Of course, it does not need battery anymore, just a single apple can provide hours of energy. ( I'm not sure if it is genetically modified, it was not labeled. )

P.S. I just had a hard time posting this since I had to find a replacement hard drive for my laptop :-)
Saturday, April 11, 2015
Perfect Cardboard Boat Design
Go to a home improvement store like The Home Depot and ask for a large box like the refrigerator box.
Open both ends of the box and lay it on its narrower side. Measure the longer side and using the exacto knife score the wider sides at A and B. Score the shorter side at its half ( C ) from the outside and 3 inches on its both sides from the inside ( D and E ). D, C, and E will become the "spine" of the boat to keep the bottom rigid. Because of the spine, A-F and B-G will be shorter on the bottom and create an air filled and stronger sides to better handle the pressure from the water. When you are done, you can fold in the ends tape the seems and give it a polyurethane coat to keep the water soaking into the paper.
You can also roll up more cardboard and tape it across the top edges of the sides to strengthen the edges. This design should give you about an hour of fun and a spectacular sink at the end. Have fun!!!

You can also use boxes glued together to provide small compartment for each boater and stability for the boat. Long boats can buckle in the middle and needs to be braced, but the box design provides the needed stability.

Saturday, March 28, 2015
Python in Eclipse ( PyDev )
Eclipse is an excellent choice for beginning programmers not just because of its feature rich interface, but also for its support for many programming languages. These days, I would suggest starting with C/C++ then move to Java and last try to also learn Python for a "well rounded" computer science skill arsenal.
Installation steps
1. Download
the latest Java JDK
2. Download
Eclipse IDE
3. Download
Python
4. When Eclipse is running and the workspace is configured, you can just
drag and drop the PyDev icon directly from the browser to the Eclipse
workspace or install it manually.
Browser drop: http://marketplace.eclipse.org/content/pydev-python-ide-eclipse

Browser drop: http://marketplace.eclipse.org/content/pydev-python-ide-eclipse
PyDEv requirements, at
least one of:
- Python (2.2 or newer)
- Jython (2.2 or newer)
- IronPython
(2.6 or newer)
Click on Help and then Install New Software .... Add the source to PyDev ( http://pydev.org/updates ) and select the PyDev software installation. It will take a few minutes to install and you will need to restart Eclipse for the installation to finish.

Your First Project
That is all that you will need to install Python in your Eclipse IDE and start developing software in this new language.
You can create a new Python PyDev module and quickly learn the basics.
File->New
-> PyDev Module
Give
it a name like “testProject” and leave everything else default. If you receive a message when you create the PyDev module about the interpreter not being configured, just select the auto configuration option or manually point your IDE to the python.exe file from the path you chose to install Python into.

Example Code and Output
import
sys
'Examples
from: https://wiki.python.org/moin/SimplePrograms'
parents,
babies = (1,
1)
while
babies < 100:
print
'This generation has {0}
babies'.format(babies)
parents, babies =
(babies, parents + babies)
#
This program adds up integers in the command line
try:
total = sum(int(arg)
for arg in
sys.argv[1:])
print
'sum =',
total
except
ValueError:
print
'Please
supply integer arguments'
Output:
This
generation has 1 babies
This
generation has 2 babies
This
generation has 3 babies
This
generation has 5 babies
This
generation has 8 babies
This
generation has 13 babies
This
generation has 21 babies
This
generation has 34 babies
This
generation has 55 babies
This
generation has 89 babies
sum
= 1500
Subscribe to:
Posts (Atom)